Hammer drills chip through masonry instead of spinning uselessly against it. Here is when you need one and what actually matters.
⚡ The Short Answer
A hammer drill adds a rapid forward percussion to the normal rotation, so the bit chips its way into brick, block and concrete. A standard drill cannot do this — it just heats up and burnishes a shiny spot on the masonry.
Buy one if you fix things to brick or block walls with any regularity: shelves, TV brackets, fence posts, handrails, outdoor lights.
Know the difference from an SDS rotary hammer. A hammer drill is a drill with percussion added, good for holes up to around half an inch in masonry. An SDS rotary hammer is a different, far more powerful mechanism for larger holes and heavy concrete work.
The moment that sends most people looking for a hammer drill is trying to put a wall plug into brick with a standard drill. The bit spins, the brick smokes slightly, nothing happens, and after a few minutes there is a shallow polished dimple and a very hot drill bit.
That is not a lack of power. It is the wrong mechanism. Masonry does not cut like wood — it has to be chipped, and that means impact.
How Hammer Action Actually Works
A hammer drill has two ridged plates inside that ride over each other as the chuck turns. That makes the whole chuck move forward and back very rapidly — thousands of tiny blows per minute — while it also rotates.
The result is that the carbide tip of a masonry bit repeatedly strikes and pulverises a small amount of material, and the rotation clears the debris out of the hole. Neither action alone works: rotation without impact polishes the surface, impact without rotation just makes a dent.
Most hammer drills can switch the percussion off, so the tool works as a normal drill/driver for wood, metal and general use. That makes a hammer drill a reasonable single-drill choice — you get masonry capability without giving up everyday function.
What it is not good at: hammer mode is aggressive and noisy, and it should never be used in wood, metal, tile or anything brittle. Switch it off for those.
🧱 The simple rule: hammer mode for brick, block and concrete. Rotation only for everything else. Using hammer on tile will crack it.
Hammer Drill vs SDS Rotary Hammer
These get confused constantly, and buying the wrong one for the job is an expensive mistake in either direction.
| Feature | 🔨 Hammer drill | ⚡ SDS rotary hammer |
|---|---|---|
| Mechanism | Ridged plates, chuck moves | Piston-driven, far more energy per blow |
| Chuck | Standard keyless | SDS slot-in bits |
| Best hole size in masonry | Up to around 1/2 inch | Large holes and core drilling |
| Doubles as a normal drill | ✅ Yes | Sometimes, less convenient |
| Chiselling function | ❌ No | ✅ Often included |
| Best for | Wall plugs, brackets, general DIY | Concrete, structural work, breaking out |
For household work, a hammer drill is the right tool. Hanging shelves, mounting TV brackets, fixing handrails and fence brackets into brick are all comfortably within its range, and it still works as your everyday drill.
Move to SDS if you are drilling large holes in concrete, working through dense structural material, or doing enough masonry that speed matters. An SDS hammer does in seconds what a hammer drill labours at for minutes — but it is a specialist tool most homeowners do not need.
Specs That Matter
- Two speed settings. Low gear gives torque for driving and large bits; high gear gives the speed masonry drilling needs. Essential.
- Hammer mode that switches off. So the tool works normally for wood and metal.
- Blows per minute (BPM). More impacts means faster progress in masonry. It matters more than raw torque for this job.
- 1/2 inch chuck. Accepts larger masonry bits and hole saws.
- Brushless motor. Genuinely worth it here — masonry drilling is hard work and brushless motors run cooler and get more from each charge.
- Side handle. Not a luxury. When a masonry bit binds, the tool twists hard, and a side handle is what keeps it under control.
- Weight and grip. You may be drilling above head height into a ceiling or high wall.
⚠️ Always fit the side handle for masonry. If a bit catches on rebar or a hard aggregate stone, the drill can twist violently. A side handle gives you the leverage to control it — this is the most common way people hurt a wrist with a drill.
Our Pick
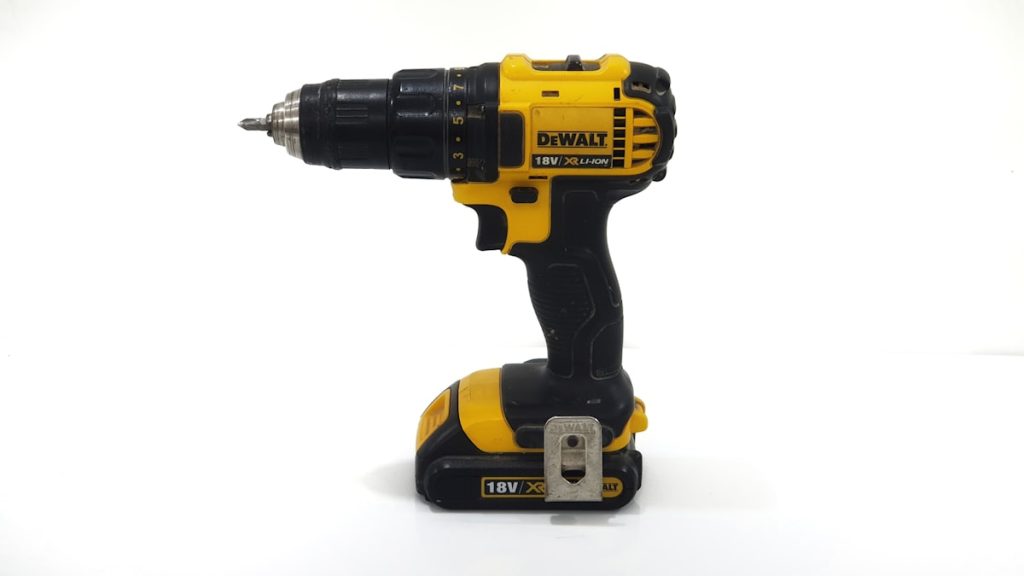
DEWALT 20V MAX XR Brushless Cordless 1/2 in. Hammer Drill (Tool Only)
Best Cordless Hammer Drill★★★★★ 4.6 out of 5 — serious masonry capability
This is DEWALT’s most powerful 20V MAX two-speed hammer drill, rated by the manufacturer as up to 109% more powerful than the model it succeeds. The brushless motor matters here more than on a general-purpose drill, because masonry drilling is sustained hard work that heats a brushed motor and drains batteries quickly. The 1/2 inch chuck takes larger masonry bits.
- ✅ Brushless — cooler running and better battery life under sustained load
- ✅ Two speeds — high gear for masonry, low for driving
- ✅ 1/2 inch chuck for larger masonry bits
- ✅ Hammer switches off so it works as a normal drill
- ⚠️ Tool only — needs 20V MAX batteries and a charger, so it suits existing DEWALT owners
- ⚠️ Not an SDS — for large concrete holes you still want a rotary hammer
- ⚠️ Best for: regular masonry fixing, existing 20V MAX battery owners
Price and availability change often — the button shows the live Amazon price.
Comparison
| Tool | Hammer | Motor | Format | Best for |
|---|---|---|---|---|
| DEWALT XR hammer drill | ✅ Yes | Brushless | Tool only | Regular masonry work |
| DEWALT drill driver set | ❌ No | Brushed | Kit with battery | Wood, metal, general DIY |
| DEWALT drill + impact combo | ❌ No | Brushed | Kit | Driving lots of screws |
💬 Affiliate disclosure: as an Amazon Associate, DetailSanderGuide may earn from qualifying purchases. This costs you nothing extra and never changes which tools we recommend.
Bits — The Other Half of the Job
A hammer drill with the wrong bit is as useless as a standard drill. Masonry bits are a specific design and not interchangeable with wood or metal bits.
- Masonry bits have a carbide tip brazed onto a steel shaft, wider than the shaft itself, designed to survive repeated impact.
- Match the bit to the plug, not the screw. Wall plug packaging states the drill size — follow that, because an oversized hole means the plug spins uselessly.
- Bits blunt with heat. A masonry bit that has gone blue or stopped biting is finished. They are consumables.
- Do not use masonry bits in wood. The tip geometry tears rather than cuts and gives a ragged hole.
- Do not use hammer mode on tile. Drill tile with a tile or diamond bit, rotation only, or you will crack it.
- Buy a set covering common plug sizes rather than single bits — you will use several sizes across one project.
How to Drill Masonry Properly
- Check what is behind the wall. Use a detector for cables and pipes before drilling. Electrical cables typically run vertically and horizontally from sockets and switches — drilling into one is genuinely dangerous.
- Mark the hole and start on rotation only. A few seconds without hammer creates a small locating dimple so the bit does not wander across the surface.
- Switch hammer on and drill steadily. Firm, consistent pressure — enough that the bit is cutting, not so much that you are leaning on it.
- Keep the drill square to the wall. Angling it produces an oval hole that the plug will not grip.
- Withdraw periodically to clear dust from the hole. A hole packed with dust stops the bit cutting and overheats it.
- Drill slightly deeper than the plug. Dust settles in the bottom, and a plug that will not seat fully is a weak fixing.
- Vacuum the hole out before inserting the plug. Dust left in the hole dramatically reduces holding strength.
- Ease off near the far side if drilling right through, to avoid blowing out the surface.
If the bit stops progressing entirely, you have likely hit something hard — an aggregate stone in concrete, or steel reinforcement. Stop rather than forcing it. Move the hole slightly, or switch to a bit rated for rebar if you must go through.
Common Mistakes and Fixes
1. Using a standard drill on brick
Result: a hot bit, a shiny dimple and no hole.
Fix: hammer mode with a carbide masonry bit.
2. Leaving hammer mode on for wood or tile
Result: torn wood, cracked tile.
Fix: switch percussion off for anything that is not masonry.
3. Not fitting the side handle
Result: the drill twists hard when a bit binds, wrenching your wrist.
Fix: fit it every time you use hammer mode.
4. Wrong hole size for the plug
Result: the plug spins in the hole and the fixing pulls out.
Fix: use the drill size printed on the plug packaging.
5. Leaving dust in the hole
Result: the plug does not seat and the fixing is weak.
Fix: vacuum or blow the hole clear before fitting.
6. Forcing through rebar
Result: a destroyed bit and possibly a damaged structure.
Fix: stop, reposition the hole slightly.
7. Not checking for cables and pipes
Result: potentially serious injury or an expensive repair.
Fix: always use a detector, and think about what is on the other side of the wall.
Safety and Silica Dust
Drilling masonry produces dust containing crystalline silica, which is a recognised long-term respiratory hazard. It is not something to be casual about, particularly if you drill regularly.
- Wear a properly fitted respirator rather than a loose paper mask, especially for repeated or overhead drilling.
- Use dust extraction if you can. Some drills accept a dust shroud, and holding a vacuum nozzle beside the hole captures a surprising amount.
- Eye protection always. Masonry chips fly, and overhead drilling puts debris directly above your face.
- Hearing protection. Hammer drills are genuinely loud, and the noise is percussive.
- Ventilate and let dust settle before cleaning up. Sweeping relaunches it into the air.
- Keep others out of the immediate area while drilling.
General dust precautions are covered in our dust safety checklist.
Choosing the Right Fixing
Drilling the hole is only half the job. The fixing you put in it decides whether the shelf stays on the wall, and different wall materials need completely different approaches.
| Wall type | Fixing | Notes |
|---|---|---|
| Solid brick | Plastic wall plug or frame fixing | Reliable and strong; aim for the brick, not the mortar |
| Concrete block | Plug or sleeve anchor | Softer than brick — do not overtighten |
| Aerated block | Specific aerated-block fixings | Standard plugs pull straight out |
| Plasterboard (drywall) | Cavity anchor or toggle | No hammer drilling — plugs alone will fail |
| Concrete | Sleeve or through-bolt | Heavy loads need mechanical anchors |
Drill into the brick rather than the mortar where you can. Mortar is softer, crumbles more easily, and gives a noticeably weaker fixing — though for light loads it is acceptable and easier to make good later.
Plasterboard is the one that catches people out. Hammer mode will punch straight through and destroy the board. Find a stud if the load is significant, or use a proper cavity fixing rated for the weight. Ordinary wall plugs in plasterboard will pull out with almost no load.
Match the fixing to the load. A picture hook and a wall-mounted TV are very different problems. For heavy items, use several fixings spread across studs or solid masonry rather than relying on one strong one.
Keeping the Tool Working
- Let it cool on long jobs. Masonry drilling generates real heat in both bit and motor. A series of holes in concrete deserves breaks.
- Blow out the vents. Masonry dust is abrasive and finds its way into motor cooling vents, where it causes overheating.
- Check the chuck regularly. Percussion loosens things, and a bit slipping in the chuck damages both.
- Keep the side handle with the tool. The most common reason people do not use it is that it is in a drawer somewhere.
- Replace blunt bits. A blue or rounded carbide tip will not cut and puts more strain on the tool.
- Store batteries above freezing and do not leave them fully discharged.
Real-World Examples
The TV bracket that came off the wall
A heavy bracket fixed into plasterboard with ordinary plastic wall plugs. It held for a few weeks, then the plugs pulled through the board and the television came down. Plasterboard has almost no pull-out strength with standard plugs — this needed either the studs behind the board, or proper cavity anchors rated for the load. Hammer mode should never have been used either; it punches straight through the board.
The hole that would not go any deeper
Someone drilling into a concrete lintel gets about an inch in and then progress stops completely, with the bit heating up. Almost certainly steel reinforcement. Forcing it destroys the carbide tip and can weaken the structure. The right response is to move the hole a few inches and try again — reinforcement usually runs in a predictable pattern, so shifting sideways often finds clear concrete.
The shelf that spun in its hole
Someone drills with the nearest bit to hand rather than the size printed on the plug packaging. The hole ends up slightly oversized, the plug rotates instead of gripping when the screw goes in, and the fixing never tightens. Matching the bit to the plug — not to the screw — solves it, and it is the most common wall-plug mistake there is.
Corded vs Cordless for Masonry
Masonry drilling is one of the few remaining jobs where corded tools still make a genuine case for themselves.
Corded hammer drills deliver constant power that never fades, and they cost considerably less for the same capability. For a long session — fixing battens across a whole wall, or a run of fence brackets — a corded tool simply keeps going while a cordless one works through batteries. Masonry is hard, sustained work, and it drains packs faster than almost any other drilling task.
Cordless hammer drills win on convenience, particularly outdoors, up ladders, or anywhere a cable is impractical. Fixing a light to a garden wall or a bracket to an outbuilding is far easier without hunting for an extension lead. Modern brushless models have closed much of the power gap.
The practical answer: if you already own batteries on a platform, buy the cordless bare tool — it is the cheapest route to the capability. If you own nothing and expect occasional masonry work near a socket, a corded hammer drill gives more power per pound spent and never has a flat battery when you need it.
Frequently Asked Questions
Do I need a hammer drill or a regular drill?
If you fix anything to brick, block or concrete walls, you need hammer function — a standard drill will not make progress in masonry regardless of how powerful it is. If your work is wood, plasterboard and metal, a standard drill/driver is fine and often lighter and cheaper. Since most hammer drills switch the percussion off and work as normal drills, buying one gives you both capabilities in a single tool.
What is the difference between a hammer drill and an SDS rotary hammer?
A hammer drill uses ridged plates to vibrate the chuck rapidly forward and back — good for masonry holes up to roughly half an inch, and it doubles as a normal drill. An SDS rotary hammer uses a piston mechanism that delivers far more energy per blow, takes slot-in SDS bits, often includes a chiselling mode, and drills large holes in concrete far faster. For household fixings, a hammer drill is the right tool; for structural concrete work, SDS.
Can I use a hammer drill on wood?
Yes, with the hammer function switched off — then it behaves as a normal drill/driver. Never use hammer mode in wood: the percussion tears the fibres and gives a ragged, oversized hole. Also switch it off for metal, tile and any brittle material. Tile in particular will crack almost immediately under percussion, so use a tile or diamond bit on rotation only.
Why won’t my masonry bit go into the wall?
Common causes are hammer mode not being switched on, using a wood or metal bit instead of a carbide masonry bit, a blunt bit that has overheated, or hitting something hard like an aggregate stone or steel reinforcement. Also check you are letting the tool work rather than leaning on it — excessive pressure generates heat and slows progress. Withdraw periodically to clear dust, which otherwise packs the hole and stops the bit cutting.
Is a brushless hammer drill worth it?
For masonry work specifically, yes — more so than on a general-purpose drill. Drilling brick and concrete puts the motor under sustained heavy load, which is exactly where brushless motors show their advantage: they run cooler, last longer and deliver noticeably more holes per battery charge. If you only drill masonry occasionally, a brushed hammer drill will still do the job perfectly well.
Masonry Drilling Checklist
- Cable and pipe detector used before drilling
- Side handle fitted
- Carbide masonry bit fitted, sized to the wall plug
- Hammer mode switched on for masonry, off for everything else
- Respirator, eye and hearing protection on
- Hole started on rotation only to create a locating dimple
- Drill held square to the wall
- Bit withdrawn periodically to clear dust
- Hole drilled slightly deeper than the plug
- Hole vacuumed out before fitting the plug
- Stopped rather than forced if the bit hits rebar
Final Thoughts
A hammer drill solves one specific problem — getting a hole into masonry — and it solves it completely. Since the percussion switches off, you also keep a perfectly good general-purpose drill.
Get one with two speeds and a brushless motor if you drill masonry regularly, always fit the side handle, use proper carbide bits sized to your wall plugs, and take the silica dust seriously.
🔧 What to read next: if masonry is only an occasional job, our budget cordless drill guide covers the everyday options. For precision holes at a bench, see floor drill presses.