
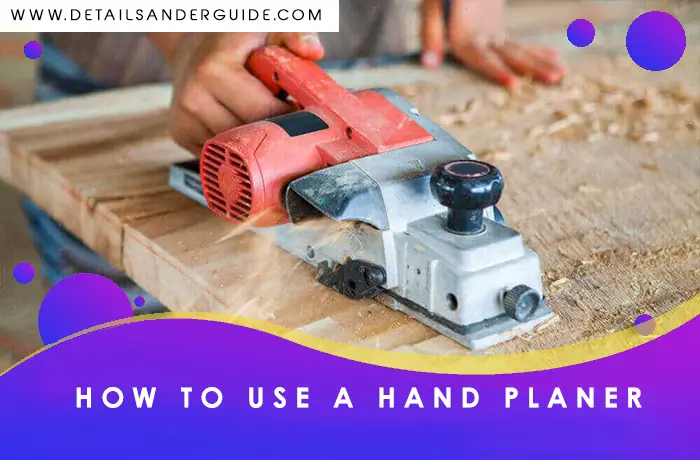
How to use a hand planer


Armor All AA255W Wet/Dry Utility Vac 2.5 Gallon, 2.5-Gallon,120 Volts (AC), Orange/Black
54% OffSTRONG SUCTION: 2 Peak HP to quickly clean-up wet and dry messes COMPACT AND PORTABLE: The 2.5-gallon durable polypropylene tank is perfect for small messes and the wheel-base and top handle make it easy to carry on the job CONVERTS TO BLOWER: Easily... read more

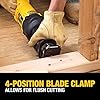
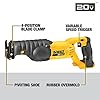
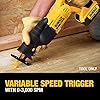

DEWALT 20V MAX Reciprocating Saw, 3,000 Strokes Per Minute, Variable Speed Trigger, Bare Tool Only (DCS380B)
37% Off4-position blade clamp of DEWALT 20V reciprocating saw allows for flush cutting and increased positional versatility with tool-free blade changes 1-1/8-inch stroke length delivers a fast cutting speed Variable speed trigger with 0-3000 spm provides i... read more
Every handyman is recommended to have a hand plane in his toolbox, as this versatile and inexpensive tool can quite literally change their lives. A hand plane is relatively easy to use, even by beginners. A little bit of practice and patience is all that is required to become proficient in using this nifty tool. Although this tool is something that carpenters are generally reliant upon, if you’re someone who’s into DIY home improvements, a hand plane can be life changing for you. Hand planes are generally quite cheap too, and will cost you around $20 or so.
How to use a hand planer – the workings of a hand planer
The size of a hand plane varies from what type of company you might be purchasing it from, but it generally has a length of roughly 6 to 14 inches, with a width of approximately 2 inches. A hand plane is completely flat on its bottom, with handles on top of it that can be used to steer and navigate it while you use it. The bottom, though flat, also has an extremely thin, razor sharp blade that has been manufactured into the handplane at a specific angle, allowing you to shave off or cut off thin slices of wood when the hand plane is pushed in a forward direction.
A hand planer can be utilized for multiple DIY projects all around the house. If you’re not sure how to use a hand planer, don’t worry. The following article will be a detailed guide for ways you can use a hand planer for your DIY projects that will allow you to efficiently carry out your project, as well as save you a lot of precious time.
How to use a hand planer to flatten a board
If a board is too nice and wide to rip in half, that is where hand planers come in. A hand planer might take some time, but it is an excellent way of flattening a board. A board that has been cut may be stumpy, and will have varying high and low parts on it instead of being completely flat and smooth. By using a hand planer, you simply plane off the excess wood and make the board completely flat.
It’s important to make sure that the area you’re working on is completely flat, and that your board is placed securely to avoid any movements which may result in excess planing during the process. During the planing process, keep using a straightedge to make sure that you’re working in the right direction. Using a straightedge between the processes also allows you to determine how much more of the wood you need to plane off. Using light passes and short strokes while flattening a board is a great way to avoid wastage by planing off excess wood.
After you’re done planning, you need to check for twists present in the board by using winding sticks. This allows you to determine any high points present in the farther corners that need to be planed down. This can be done by dividing your board into four quadrants. Work your way to the center point from the quadrants, and plane down the higher points or the “twists” of the board. This will make the corners of the board match, which can be checked through winding sticks and will make your board reasonably flat. Such a technique is one way on how to use a hand planer to flatten wood.
Some individuals may be googling “how to use a hand planer as a jointer” and whether a hand planer can be used instead of a jointer. To put it simply, the answer is yes. Since the surface of the board will end up being rough after hand planning it, this replaces the need for a jointer.
A hand planer can thus be used as an inexpensive substitute for a jointer. This similar technique can also be used to smooth down uneven tables, if you’re wondering how to use a hand planer on a table top. Simply polish the table after the planning process to give it a smooth, stylish, and professional look.
How to use a hand planer on a door
If your door ends up sticking, binding, or simply does not close, it might just be the right time to give it a little tweaking so that it goes back to having an ideal gap of ⅛ inches between the doorframe. One way of ensuring that this ideal gap between a door and door frame is met is by using a hand plane to shave down thin strips of excess wood, and allowing the door to work and swing smoothly again.
Before you actually plane off the door, assess the areas of the jam by opening and closing the door a few times. By using a thin piece of cardboard and placing it between the door and doorframe, you can determine the starting and ending points of the problematic areas on the door. Use a pencil to add markings to these areas, which will allow you to remember that these are the problematic areas that you ended to shave down. Using a pencil and a ruler, also mark down the distance of ⅛th of an inch between the door and the doorframe as well. Make sure that these markings are done on each side of the door to make sure that the door is completely vertical and symmetrical after it has been shaved down.
Lightly shave off the problematic areas of the door, or the entire door length if necessary. Do this in short strokes in a timely manner, and keep assessing the process to avoid shaving down too much of the door. While shaving off the door, place it firmly between your legs to avoid any mistakes during the planning process. This method is suitable for when you’re shaving off certain problematic areas of the door. However, if you’re planning off the entire length of the door, professionals would recommend taking the door out of its hinges and laying it flat for a more accurate and symmetrical shave.
Once you’ve shaved off enough so that the door fits and swings perfectly in place, sand the door and paint over it to give off a more polished and professional look.
Tips for using a Hand Planer
- Go with the grain, not against the grain during the planing process. This will avoid excess splits from arising on your wooden board, and will account for a much smoother planing process.
- If you must use the handplane against the grain rise, it’s recommended to attach a small block of wood near the edge of the cross grain rise, which works as a sacrificial block. This precaution ensures that when the planer reaches the area of the cross grain rise, it will end up tearing and splintering the wooden block that was attached, rather than the board or piece that you are working on.
A hand planer is an inexpensive and versatile tool that ends up being useful for most projects. If you don’t already own a hand planer, it’s recommended that you go buy one for yourself right now.


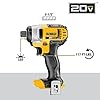
DEWALT 20V MAX Cordless Drill and Impact Driver, Power Tool Combo Kit with 2 Batteries and Charger (DCK240C2)
42% OffDCD771 in cordless drill combo kit features two speed transmission (0-450 / 0-1500 RPM) DCD771 high performance motor of cordless tools combo kit delivers 300 unit watts out (UWO) of power ability completing a wide range of applications DCD771 compac... read more


2025 NEW 4V Cordless Electric Scissors, Cardboard Cutter with 2 Titanium Blade, Safety Lock & Extra Blade, Rotary Cutter for Cardboard,Fabric,Plastic, Gifts for Men&Women - White
37% OffTITANIUM-COATED BLADE: Tired of box cutter blades that dull after just a few uses? Our electric scissors are equipped with a titanium-coated SKS7 blade, a premium high-carbon alloy steel that delivers razor-sharp precision even after 100,000+ continu... read more